Monday, September 17, 2012

Fun with wax cloth - tote and zipper pouch


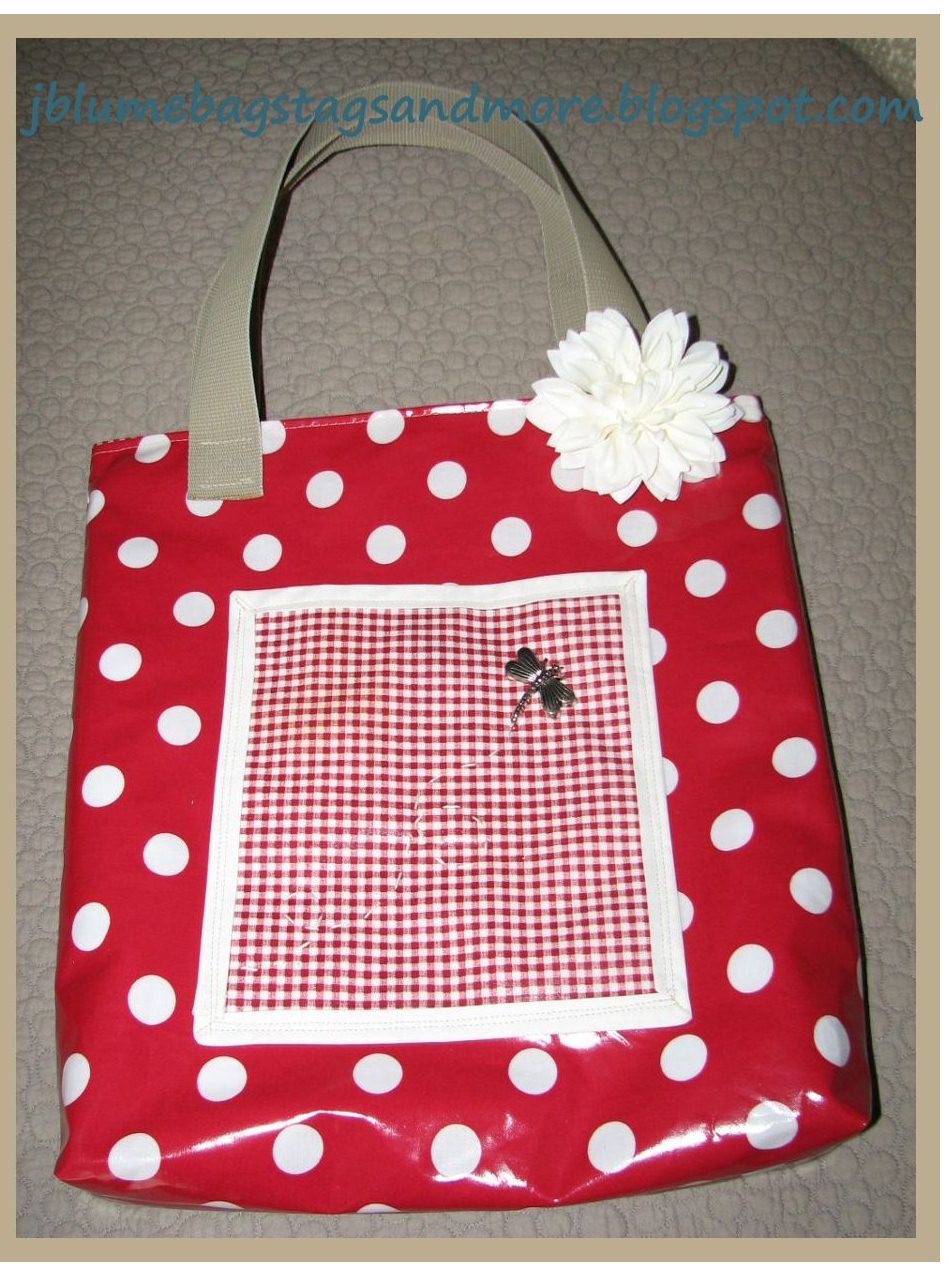
It has been a fun morning in the sewing room for me! I completed a tote bag with a recessed zipper top (first one ever made...!) and a small zipper pouch, both made from red & white polka dot wax cloth. I love that stuff but it can be a bit challenging to sew if one doesn't have the right footer on the sewing machine. I learned the hard way last year...fabric didn't move through the footer and ended up looking TERRIBLE! Now I have a good teflon-coated footer and all is well!

I love how they both turned out! I found a cute metal dragonfly in my stash of stuff  and put it on the outer pocket of the tote and stitched some little loops to look like it was flying. This pocket also has a magnetic close to help keep those little bits and bobs inside the pocket. I found this tutorial from the blog My Spare Time to show how to sew a recessed zipper. To be honest, I am glad the first one is done as I've been too scared to try it on any other bags. I'm happy to say it was much easier than I expected :-)!

Here are a few more close up photos:
Recessed zipper tote - size approx 16 in h x 15.5 in w

Inside of zipper tote bag

Zipper pouch with handle - size approx. 9in w x 5.5 in h
I have more projects in process and will post more soon!

Jxx


Saturday, September 1, 2012

DIY Tag tree: 40 Reasons why you are...SPECIAL!

One of my dearest friends in Zurich celebrated the BIG 4-0 last week and because she is such a wonderful, caring person who would do ANYTHING for ANYONE at ANYTIME, we wanted to do something extra special for her to let her know how much she means to us.

Being the crafty one of our little group of gals, I thought it would be fun to make 40 tags stating all the reasons why she is so special to us (of course, we could have come up with more but thought we should restrict it to 40 for 40!). Over a coffee and chat, we had fun stamping, punching, stitching and gluing tags with what all we came up with. Then we rummaged through my house for the perfect vase (that just so happened to have perfectly matching sprays of fake flowers), added some curly hazelnut branches from lovely Nicole's yard, tied all the tags to the branches, added a bit of burlap-type fabric around the vase with some coordinating ribbons and VOILÀ, here's the result:


Yvette was so happy with it and she told me today (almost a week after receiving it) that she still hasn't been able to read all the tags because she gets too emotional! 

I am so blessed to have such wonderful friends here in Zurich since our families live more than 4500 miles away. Thank you to all my lovely ladies for your kindness, help in times of need, and also all those enjoyable coffee mornings that we couldn't live without!!!!  May God bless you all!

J xx

Friday, August 31, 2012

Handmade gifts featured on "The 36th Avenue"

As the rain and cooler temps return to Zurich, after what turned out to be a beautiful, warm and sunny summer, I am starting to think of the holidays... I know you must be saying to yourself that it is only the beginning of September (well, almost!) and there's 4 months until Christmas! Well, I have set myself a goal to make homemade gifts this year (yikes!), as well as holding a little Christmas market at my house in early December similar to what we did a couple years ago (see previous market post here).

When trolling through Pinterest (something I do on a daily basis...often multiple times a day... yes, call me an addict!), I came across the following photo and link to The 36th Avenue blog. Oh boy, does it have some amazing DIY ideas from handmade gifts to DIY furniture makeovers. I do believe that I will be following this blog on a regular basis!

If you are up for a bit of DIY Christmas presents or think you would like to do something special for your home, I highly recommend checking this blog out. I've put the links for the handmade gifts, parts 1 and 2, below for your convenience.
Link to: 25 Handmade Gifts part 1
Link to: 25 Handmade Gifts part 2

Let's all get creative this year and make something special for our loved ones!

J xx

Thursday, August 9, 2012

Discover - Great Big Stitched Postcard Swap


I'm finished! Here's my postcard that will be sent tomorrow to another swap participant in South Carolina! I had to incorporate a few Swiss mountains into it :-)! If you are interested in seeing other swap cards for inspiration, you can check them out on the Great Big Stitched Postcard Flickr page.

Have a great day!
J xx

Sunday, August 5, 2012

Recipe: Quinoa & Vegetable Stuffed Zucchini

I love summer - sunshine, swimming in the lake, playing with the kids and loads of fresh fruits and veggies at their prime! We are blessed to have a wonderful neighbor who has helped us plant some veggies in the garden, including kale, tomatoes, fennel and various types of lettuce. It tastes so much better knowing that it has been grown with tender, loving care (and no pesticides!).  Yesterday, she gave us a huge zucchini to welcome us back from our vacation. As I say, WONDERFUL neighbor!! I stuffed it tonight with a mix of kale (also from the garden!), fresh Roma tomatoes from our trip to Tuscany, quinoa (a staple in our house) and a few other fresh ingredients. I thought I would share the recipe with you, so you, too, could enjoy the fresh bounties from the summer produce! I use a similar stuffing to make red and yellow stuffed peppers and generally just throw in whatever I have in my fridge. It is quite a versatile recipe, so feel free to get creative with whatever ingredients you have in stock!

Quinoa & veggie stuffed zucchini with fresh basil

Quinoa & Vegetable Stuffed Zucchini 
Serves 3-4 people

1 or 2 large zucchinis
2 Tbsp oil and 2 Tbsp butter
1 onion, chopped
3 cloves garlic, minced
3-4 large kale leaves, finely chopped (including the white stems); you could also use spinach
3-4 Roma or similar tomatoes (we had fresh ones from Tuscanny - yummmy!)
1/2 to 1 cup cooked quinoa (depends on your taste and the size of the zucchini)
Herbed cream cheese - I used about half of a round of "Boursin" with garlic and herbs
1-2 Tbsp fresh basil, thinly sliced
Sea salt and freshly ground pepper (to taste)

Wash your zucchini(s) and then cut in half. Scoop or cut out the inside of the zucchini halves, leaving about half an inch of the flesh with the skin. Finely chop the flesh that you scooped out as this will go into the filling.
Scoop inside of zucchini, leaving 1 /4-1/2 inch of flesh 

To prepare filling:
Heat your oil and butter in a medium to large pan (again depends on amount you are making). Sauté onion and garlic and sauté approximately 5-7 minutes or until they start to soften. Add chopped zucchini and continue to cook for another 2-3 minutes. Add kale, tomatoes and quinoa and continue cooking for about 3-4 minutes, stirring occasionally. Finally, add herbed cream cheese, basil, sea salt and pepper (to taste) and stir until melted through (about 3-4 minutes). Remove from heat.
Zucchini with stuffing before going into the oven

Stuff zucchini halves with filling and cover with foil. Bake covered at 400 F (200 C) for about 25 minutes. Uncover and continue baking for another 15-20 minutes or until done. I like to turn on the convection (air/fan function) for the last 8-10 minutes to crisp up the top.

Serve with fresh basil on top and a drizzle of extra virgin olive oil. ENJOY!

Enjoy the rest of your summer! It is hard to believe that we only have 2 weeks left until school starts again...
J xx

Friday, July 13, 2012

The Great Big Stitched Postcard Swap


I'm IN!!!! This swap is through the Do What You Love blog that I follow. I've never done anything like this before but thought it would be something fun for the summer. I mean, really, what could be more fun than combining my love of paper, fabric and stitching to create a "Discover" themed postcard to swap with someone else in this great world of ours??? YEAH!!!

If you are also interested in doing something creative this summer, you can register via this link.

Hope you are having fun so far this summer! My kiddies had their last day of school today, so let the fun begin!!!

J xx

Wednesday, June 27, 2012

Birds and butterflies

Hello!!!!  I hope you are enjoying the summer so far! Our kiddies still have two weeks of school left so we haven't "officially" started summer yet here in Zurich, but we have been enjoying the sunshine and warm temps that finally arrived after my last post! We celebrated Miss A's birthday earlier this month and will celebrate Mr Z's birthday tomorrow. He hits double digits this year and this fact really makes me feel old, as well as feel like time is shooting past me at warp speed... Has anyone out there figured out how to slow it down yet???? Please pass this wisdom on to me if you have!

I don't know about you, but I am in love with most things with birds (bird houses, bird cages, etc...) and/or butterflies on them. I simply can't get enough, especially the bird theme. I went into Zurich yesterday to check out some of the half year sales (yes, they generally only have sales twice a year unlike twice a week in the US!) and, of course, found two things NOT ON SALE but that I had to get - a bird pillow for my bed and a pillow case with little bird houses all over it (for what, I am not yet sure but thinking it would make an adorable little bag of some sort!). So, going along with the birds and butterflies theme, I want to share a couple things I have been stamping and sewing over the past couple of weeks. 
Birdie tote and my new pillow :-) - the flower is a pin so it can be removed to put on something else or in your hair

Butterfly appliqué tote - again the flower can be removed

And here's a litte note card set that I made for Mr Z's teacher who is leaving at the end of this year (we will miss her!!!). I wrapped the cards in some sheer fabric and just love the softness that it gives to the set. 

Stamped notecards and coordinating envelopes

Have a great rest of the week! 

J xx